http://blog.csdn.net/nihao87224/article/details/46365597
使用c#制作activex控件
背景:觉得现有自带的打印方案模板工具已经不够用了,想把fastreport引入进来。所以选择用activex插件的形式。另外不会c++所以选择用c#来做。
环境:开发环境vs2012中选择的framework3.5、sqlserver2008 R2数据库、tomcat的BS。
目标:在BS表单中可以实现使用fastreport进行打印、打印设计功能。(按照不同公司可以有多个打印模板)
这部分开发没有太多可以说的,主要就是在vs中引入fastreport的几个dll,贴上几个主要的代码吧。
打印部分:
 public void fsPrint(string rptEntityJsonString)
        {
            try
            {
                rEntity = (rptEntity)JsonConvert.DeserializeObject(rptEntityJsonString, typeof(rptEntity));
                DataSet ds = this.getDataSetBySql(rEntity.sqlStringList);

                string rptString = string.Empty;
                //如果已经存在此类打印方案,则弹出打印模板选择界面加载之前的打印模板(如果同dataid,同branchid只有一个可供选择的打印模板则自动返回那一个)
                if (this.getRptCount(rEntity) > 0)
                {
                    if (this.getRptCount(rEntity) == 1)  //直接绑定之前存在的模板
                    {
                        rptString = GetRptString(rEntity.rptid);
                    }
                    else
                    {
                        openRptDialogForm form = new openRptDialogForm();
                        form.ReportsTable = this.getRptInfoTable(rEntity.branchid, rEntity.dataid);

                        if (form.ShowDialog() != DialogResult.OK)
                        {
                            MessageBox.Show("没有选择打印方案!");
                            form.Close();
                            return;
                        }
                        else
                        {
                            rEntity.rptid = form.ReportID;
                            rptString = GetRptString(rEntity.rptid);
                        }
                    }
                }

                FastReport.Report report1 = new FastReport.Report();
                report1.LoadFromString(rptString);
                report1.RegisterData(this.getDataSetBySql(rEntity.sqlStringList), "rptDataSet");
                foreach (DataTable dt in ds.Tables)
                {
                    report1.GetDataSource(dt.TableName).Enabled = true;
                }
                report1.Show();
                report1.Dispose();
            }
            catch (Exception ex)
            {
                throw ex;
            }
        }
打印设计:
   public void designReport(string rptEntityJsonString)
        {
            //设置订制保存打印模板的方法
            Config.DesignerSettings.CustomSaveReport += DesignerSettings_CustomSaveReport;
            Config.DesignerSettings.CustomSaveDialog += DesignerSettings_CustomSaveDialog;
            //解析rptEntity的json字符串
            try
            {
                rEntity = (rptEntity)JsonConvert.DeserializeObject(rptEntityJsonString, typeof(rptEntity));
                DataSet ds = this.getDataSetBySql(rEntity.sqlStringList);
                FastReport.Report rpt = new FastReport.Report();
                rpt.RegisterData(ds, "rptDataSet");
                //弹出新建和打开选择窗口
                choseForm choseF = new choseForm();
                if (choseF.ShowDialog() == DialogResult.OK)
                {
                    //新建方案模板
                    if (choseF.option == "New")
                    {
                        //弹出新建form
                        NewForm newF = new NewForm();
                        newF.rptEditMode = NewForm.editMode.新建;
                        newF.ReportsTable = this.getRptInfoDataTable(rEntity.branchid, rEntity.dataid);
                        newF.ThisEntity = rEntity;
                        if (newF.ShowDialog() != DialogResult.OK)
                        {
                            return;
                        }
                    }
                    //打开方案模板
                    else
                    {
                        //如果已经存在此类打印方案,则弹出打印模板选择界面加载之前的打印模板(如果同dataid,同branchid只有一个可供选择的打印模板则自动返回那一个)
                        if (this.getRptCount(rEntity) > 0)
                        {

                            //弹出编辑form
                            NewForm editForm = new NewForm();
                            editForm.rptEditMode = NewForm.editMode.打开;
                            editForm.ReportsTable = this.getRptInfoDataTable(rEntity.branchid, rEntity.dataid);
                            editForm.ThisEntity = rEntity;

                            if (editForm.ShowDialog() == DialogResult.OK)
                            {
                                rpt.LoadFromString(this.GetRptString(rEntity.rptid));
                            }

                        }
                    }
                }
                else
                {
                    return;
                }
                foreach (DataTable dt in ds.Tables)
                {
                    rpt.GetDataSource(dt.TableName).Enabled = true;
                }
                rpt.Design();
                rpt.Dispose();
            }
            catch (Exception ex)
            {
                throw ex;
            }
        }
其中值得注意的是 Config.DesignerSettings.CustomSaveReport += DesignerSettings_CustomSaveReport; 这个事件可以在回调函数中自定义保存方法,因此我为了方便将打印的模板直接保存到数据库中了。
另外关于c#制作activex控件的具体步骤参考了以下博客,受益匪浅。
http://www.cnblogs.com/homer/archive/2005/01/04/86473.html
http://www.cnblogs.com/homer/archive/2005/01/08/88780.html
http://www.cnblogs.com/homer/archive/2005/01/26/97822.html
js与activex控件的数据交互
背景:依然是由于使用的erp限制,不能直接在html页中使用object对象,注册依然是采用的如下方法 (MSComm1名字是直接复制之前电子秤里面的,懒得改了。)
function uf_GetSerPortData()
{
    try
    {
        MSComm1 = new ActiveXObject("ReportTools.rptObject");
        if ((typeof (MSComm1) == "undefined") || (MSComm1 == null))
        {
           // alert("创建打印工具对象失败!");
        }
        else
        {
            //绑定事件
           // alert("创建activex对象成功!");

        }
    }
    catch (err)
    {
       // alert(err.description);
    }
}
目标:需要将数据传输到activex端,此处选择的是json字符串方式
为了方便,写了个专门转换的js方法:
- function GetRptJsonStr(rptSqlStringArray, rptid, rptName, branchid, rptDescription, createtime, lastModifyTime, lastModifyUserID, dataid) {
- //初始化返回对象
- var retObj = {
- retState: "success",
- jsonString: ""
- }
- //初始化json格式
- var retRptJsonObj =
- {
- "sqlStringList": [],
- "rptid": "",
- "rptName": "",
- "branchid": "",
- "rptDescription": "",
- "createtime": "",
- "lastModifyTime": "",
- "lastModifyUserID": "",
- "dataid": ""
- }
- try {
- for (var i = 0; i < rptSqlStringArray.length; i++) {
- retRptJsonObj.sqlStringList.push(rptSqlStringArray[i]);
- }
- retRptJsonObj.rptid = rptid;
- retRptJsonObj.rptName = rptName;
- retRptJsonObj.branchid = branchid;
- retRptJsonObj.branchid = branchid;
- retRptJsonObj.rptDescription = rptDescription;
- retRptJsonObj.createtime = createtime;
- retRptJsonObj.lastModifyTime = lastModifyTime;
- retRptJsonObj.lastModifyUserID = lastModifyUserID;
- retRptJsonObj.dataid = dataid;
- retObj.jsonString = JSON.stringify(retRptJsonObj);
- }
- catch (err) {
- retObj.retState = err.message;
- }
- return retObj;
- }
打印设计使用的方法:
function uf_printDesign()
{

  var sqlArray = new Array();
  var sql=  "select top 10 rq, orderId,mail_no, send_name, send_phone,send_mobile,send_address, send_postcode, send_province, send_city,send_area, order_type,service_type,"
           +"receive_name, receive_mobile,receive_phone, receive_address, receive_postcode, receive_province, receive_city,receive_area,"
           +"item_name, item_number, remark, date, is_zx, is_dy,"
           +"items_value,agency_fund,dbo.f_Ch2Num(agency_fund,1) as je,fenb_seqno,bigpen,username"
           +" from int_waybill_yt"
  sqlArray.push(sql);

  var retObj= GetRptJsonStr(sqlArray,"0","测试用的打印方案","FLB","测试描述","2015-05-13T10:26:34.3448226+08:00","2015-05-13T10:26:34.3448226+08:00","PF","scc_waybill_yuantong");
  if (retObj.retState == "success") {
     MSComm1.designReport(retObj.jsonString);
  }
  else {
      alert(retObj.retState);
  }

}
activex控件的部署
背景:由于c#开发的activex控件不能像ocx那样直接用regsvr32的方式注册,如果用regasm.exe注册又不靠谱,所以选择弄成安装包的形式。一番周折之后还是选择了vs2010的安装和部署工具(InstallShield 实在是折腾不下来)
生成过程:新建vs2010安装项目,选择程序集,生成。
需要注意的:
问题描述:明明选的是3.5,但是生成的安装包却提示要4.0的framework。其实是系统必备里面勾选错了。
解决方案:
- 右键项目--》视图--》启动条件——》属性——》Version 改成3.5的
- 右键项目——》属性——》系统必备——》 去掉不必要的
问题描述:转换为activex控件。
解决方案:文件系统——》右键指定dll——》属性——》Register——》选为vsdraCOM
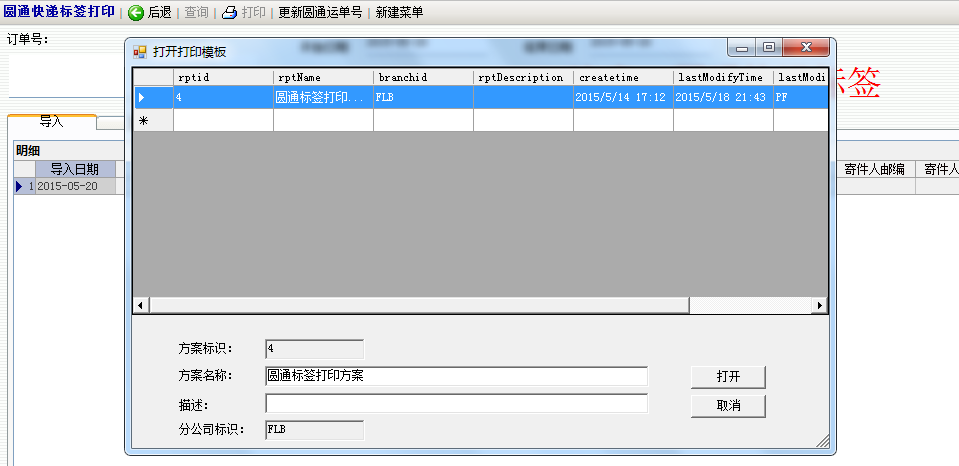
下面贴上效果图:

