1,使用ehcache-monitor-kit缓存监控这个貌似要license,需要在ehcache.xml中配置等。这里不做详述。可以参考http://www.yuananan.cn/html/article/AR64m1684VKax5Ahhp53gp.html
2,手动实现
以下是我spring配置文件中ehache的配置
<!-- Spring提供的基于的Ehcache实现的缓存管理器 -->
    <bean id="cacheManagerFactory" class="org.springframework.cache.ehcache.EhCacheManagerFactoryBean">
        <property name="configLocation" value="classpath:ehcache.xml"/>
    </bean>
    <bean id="cacheManager" class="org.springframework.cache.ehcache.EhCacheCacheManager">
        <property name="cacheManager" ref="cacheManagerFactory"/>
    </bean>
3,封装一个Cache的Service,用于查询缓存的
import java.util.ArrayList;
import java.util.List;

import javax.annotation.PostConstruct;

import org.springframework.beans.factory.annotation.Autowired;
import org.springframework.cache.ehcache.EhCacheCacheManager;
import org.springframework.stereotype.Service;

import net.sf.ehcache.CacheManager;
import net.sf.ehcache.Ehcache;
import net.sf.ehcache.Element;


@Service
public class CacheManagerService {

    @Autowired
    public EhCacheCacheManager ehCacheManager;

    private CacheManager cacheManager;

    @PostConstruct
    public void init(){
        cacheManager = ehCacheManager.getCacheManager();

    }

    /**
     * 获取所有缓存的名称
     * @return
     */
    public String[] getCacheNames(){
        return cacheManager.getCacheNames();
    }

    /**
     * 根据名称获取缓存对象
     * @param name
     * @return
     */
    public Ehcache getEhcache(String name){
        return cacheManager.getEhcache(name);
    }

    /**
     * 获取缓存名中所有的key
     * @param name
     * @return
     */
    public List getEhcacheKeys(String name){
        return getEhcache(name).getKeys();
    }

    /**
     * 根据缓存名和key获取Element对象
     * @param name
     * @param key
     * @return
     */
    public Element getElements(String name,String key){
        Ehcache cache = getEhcache(name);
        if(cache == null){
            return null;
        }

        return cache.getQuiet(key);
    }


    public List<Ehcache> getEhCaches(){
        String[] cacheNames = getCacheNames();
        List<Ehcache> list = new ArrayList<Ehcache>();
        for(String cacheName:cacheNames){
            list.add(cacheManager.getEhcache(cacheName));
        }
        return list;
    }
}
4,测试的方法
private void printCacheKeys(String line) {
        String[] params = line.split(" ");
        CacheManagerService cacheManager = BeanConfigLoad.getBean(CacheManagerService.class);
        List list= cacheManager.getEhcacheKeys(params[1]);
        System.out.print(StringUtils.rightPad("Key", 15));
        System.out.print(" | ");
        System.out.print(StringUtils.rightPad("HintCount", 10));
        System.out.print(" | ");
        System.out.print(StringUtils.rightPad("CreationTime", 25));
        System.out.print(" | ");
        System.out.print(StringUtils.rightPad("LastAccessTime", 25));
        System.out.print(" | ");
        System.out.print(StringUtils.rightPad("TimeToLive(ms)", 15));
        System.out.print(" | ");
        System.out.print(StringUtils.rightPad("TimeToIdle(ms)", 15));
        System.out.print(" | ");
        System.out.println();
        for(Object cache:list){
            Element element = cacheManager.getElements(params[1], cache.toString());
            System.out.print(StringUtils.rightPad(cache.toString(), 15));//key name
            System.out.print(" | ");
            System.out.print(StringUtils.rightPad(""+element.getHitCount(), 10));//命中次数
            System.out.print(" | ");
            System.out.print(StringUtils.rightPad(pareTime(element.getCreationTime()), 25));//创建时间
            System.out.print(" | ");
            System.out.print(StringUtils.rightPad(pareTime(element.getLastAccessTime()), 25));//最后访问时间
            System.out.print(" | ");
            System.out.print(StringUtils.rightPad(""+element.getTimeToLive(), 15));   //存活时间
            System.out.print(" | ");
            System.out.print(StringUtils.rightPad(""+element.getTimeToIdle(), 15));   //空闲时间
            System.out.print(" | ");
            System.out.println();
        }
    }
    private static String pareTime(long millis){
        try {
            Calendar calendar = Calendar.getInstance();
            calendar.setTimeInMillis(millis);

            DateFormat formatter = new SimpleDateFormat("yyyy-MM-dd hh:mm:ss.SSS");
            return formatter.format(calendar.getTime());
        } catch (Exception e) {
            log.error("",e);
        }
        return null;
    }
TIP:
这样可以在自己的系统里面做几个页面,就可以了。也不用使用1中的方法,配置了。
来一张测试方法打印的效果图:
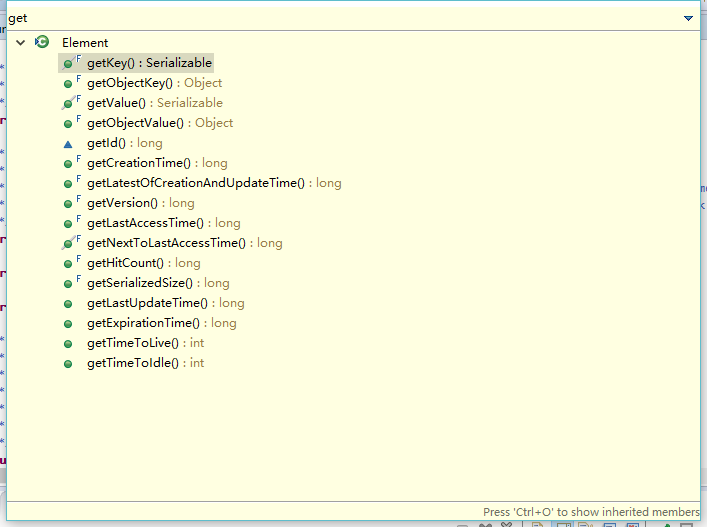
Element中还有很多其它的方法,如下图:
欢迎关注公众号:


