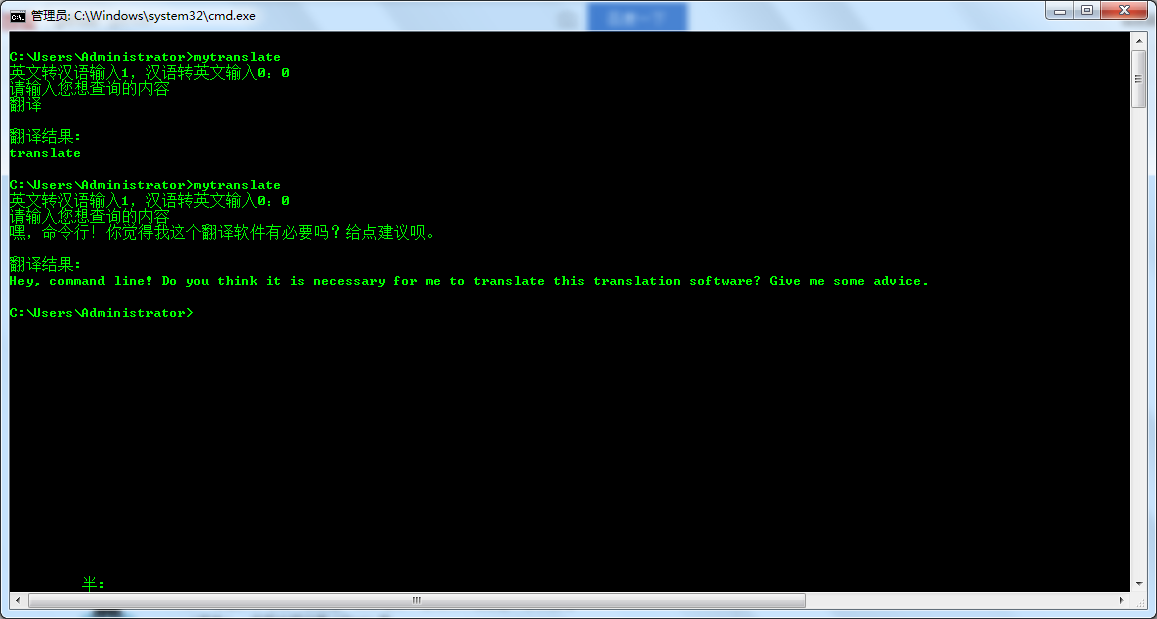
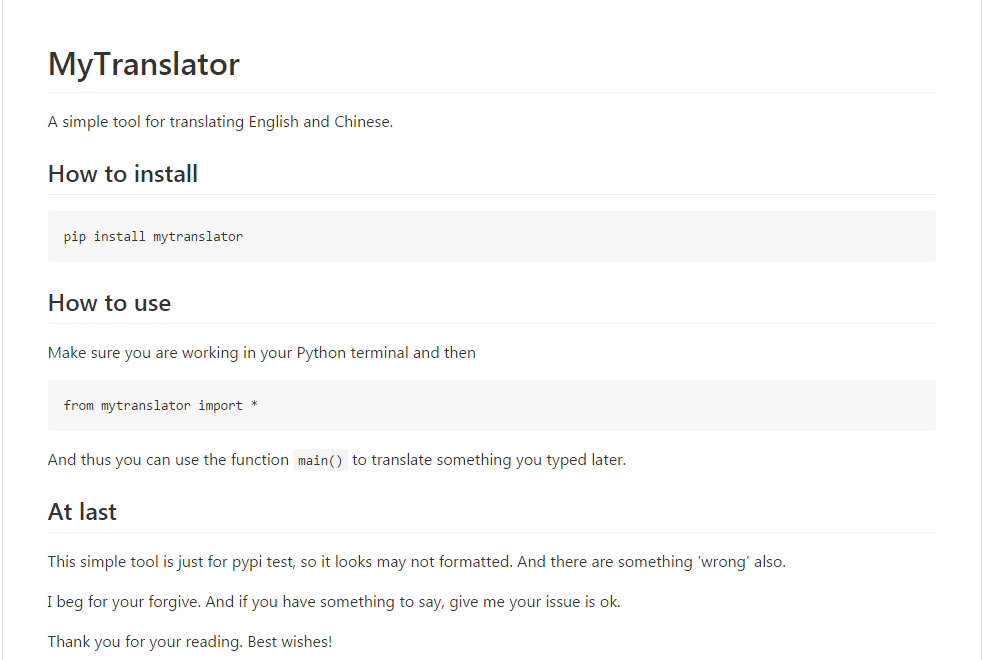
自从接触Python以来也有几个月了,虽然主要的开发语言还是Java,但对Python也算是情有独钟了。大家也都知道Python为什么会这么火,很大的一个原因就是其有丰富而且强大的库支持,一直以来都是在用别人的库,这次博主也尝试着自己做了一个分发版。
下载地址
制作的是一个命令行下的翻译工具,可以实现英汉中单词,句子的互译。当然了,也是借助了第三方的接口的。
源代码托管在Github上:https://github.com/guoruibiao/MyTranslator
pip安装
pip install mytranslator
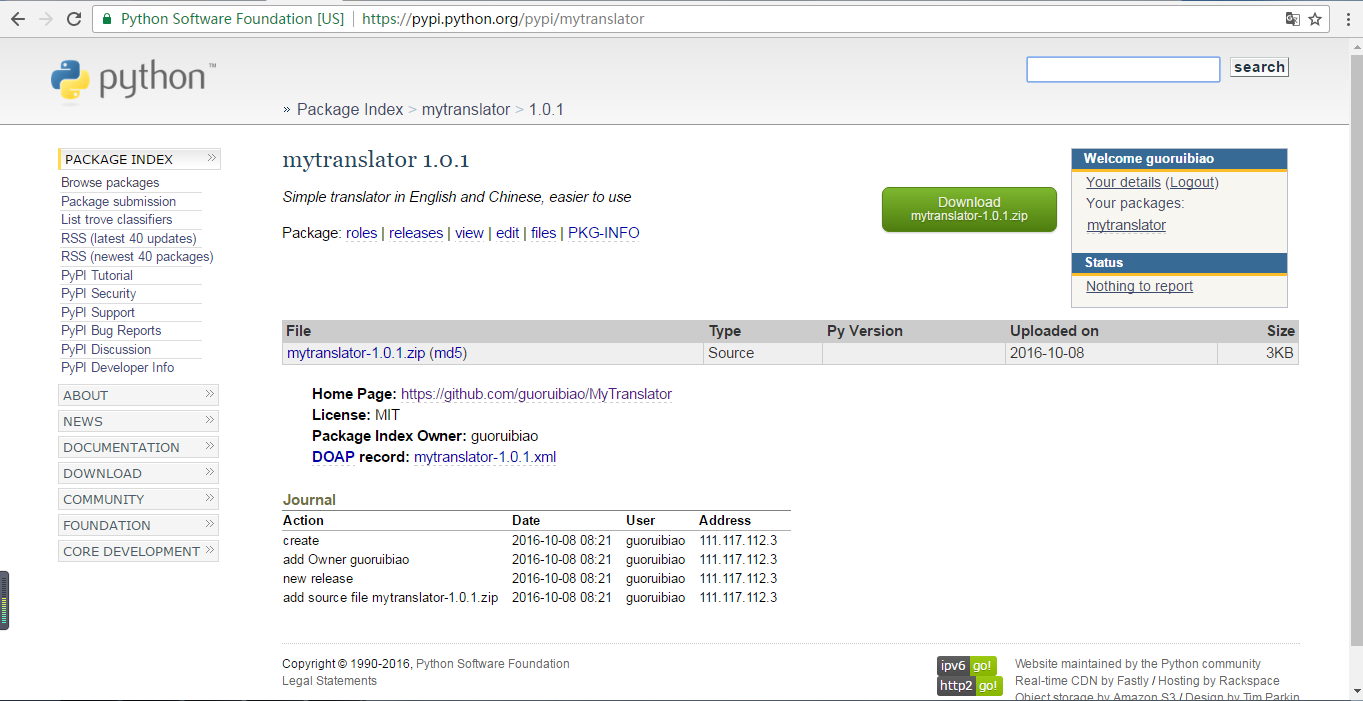
在pypi官方平台上,也是可以下载到的。如下:
如何制作分发工具呢?
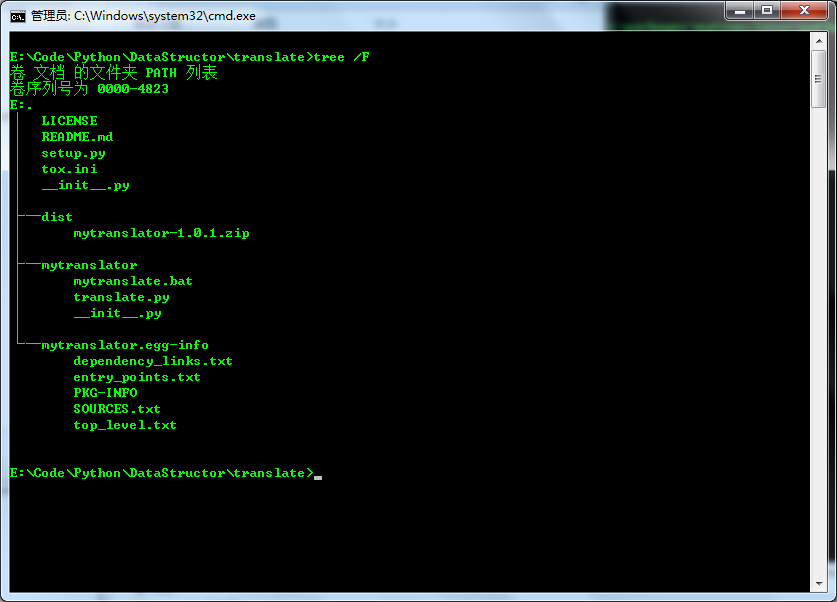
先来看下面的这个文件目录吧。
这个就是比较基础的了,其中必须的文件是setup.py和mytranslator文件夹 其他的不是必须的选项。
其他更加细节性的不妨参考:https://packaging.python.org/distributing/#uploading-your-project-to-pypi
https://wiki.python.org/moin/TestPyPI。
由于全是英文,所以需要耐下心来慢慢的品读咯。
setup.py
我们打包,以及安装Python源码的时候依赖的就是这个文件,里面配置好了安装和使用一个Python库的全部的信息。比较重要,因为官方的解释也比较的详细,就看看人家的官方配置吧,然后咱们按需进行调整即可。
"""A setuptools based setup module.
See:
https://packaging.python.org/en/latest/distributing.html
https://github.com/pypa/sampleproject
"""

# Always prefer setuptools over distutils
from setuptools import setup, find_packages
# To use a consistent encoding
from codecs import open
from os import path

here = path.abspath(path.dirname(__file__))

# Get the long description from the README file
with open(path.join(here, 'README.rst'), encoding='utf-8') as f:
    long_description = f.read()

setup(
    name='sample',

    # Versions should comply with PEP440.  For a discussion on single-sourcing
    # the version across setup.py and the project code, see
    # https://packaging.python.org/en/latest/single_source_version.html
    version='1.2.0',

    description='A sample Python project',
    long_description=long_description,

    # The project's main homepage.
    url='https://github.com/pypa/sampleproject',

    # Author details
    author='The Python Packaging Authority',
    author_email='pypa-dev@googlegroups.com',

    # Choose your license
    license='MIT',

    # See https://pypi.python.org/pypi?%3Aaction=list_classifiers
    classifiers=[
        # How mature is this project? Common values are
        #   3 - Alpha
        #   4 - Beta
        #   5 - Production/Stable
        'Development Status :: 3 - Alpha',

        # Indicate who your project is intended for
        'Intended Audience :: Developers',
        'Topic :: Software Development :: Build Tools',

        # Pick your license as you wish (should match "license" above)
        'License :: OSI Approved :: MIT License',

        # Specify the Python versions you support here. In particular, ensure
        # that you indicate whether you support Python 2, Python 3 or both.
        'Programming Language :: Python :: 2',
        'Programming Language :: Python :: 2.6',
        'Programming Language :: Python :: 2.7',
        'Programming Language :: Python :: 3',
        'Programming Language :: Python :: 3.3',
        'Programming Language :: Python :: 3.4',
        'Programming Language :: Python :: 3.5',
    ],

    # What does your project relate to?
    keywords='sample setuptools development',

    # You can just specify the packages manually here if your project is
    # simple. Or you can use find_packages().
    packages=find_packages(exclude=['contrib', 'docs', 'tests']),

    # Alternatively, if you want to distribute just a my_module.py, uncomment
    # this:
    #   py_modules=["my_module"],

    # List run-time dependencies here.  These will be installed by pip when
    # your project is installed. For an analysis of "install_requires" vs pip's
    # requirements files see:
    # https://packaging.python.org/en/latest/requirements.html
    install_requires=['peppercorn'],

    # List additional groups of dependencies here (e.g. development
    # dependencies). You can install these using the following syntax,
    # for example:
    # $ pip install -e .[dev,test]
    extras_require={
        'dev': ['check-manifest'],
        'test': ['coverage'],
    },

    # If there are data files included in your packages that need to be
    # installed, specify them here.  If using Python 2.6 or less, then these
    # have to be included in MANIFEST.in as well.
    package_data={
        'sample': ['package_data.dat'],
    },

    # Although 'package_data' is the preferred approach, in some case you may
    # need to place data files outside of your packages. See:
    # http://docs.python.org/3.4/distutils/setupscript.html#installing-additional-files # noqa
    # In this case, 'data_file' will be installed into '<sys.prefix>/my_data'
    data_files=[('my_data', ['data/data_file'])],

    # To provide executable scripts, use entry points in preference to the
    # "scripts" keyword. Entry points provide cross-platform support and allow
    # pip to create the appropriate form of executable for the target platform.
    entry_points={
        'console_scripts': [
            'sample=sample:main',
        ],
    },
)
源码包
这里关系到了包的概念了,通俗的来讲就是包含了一个__init__.py文件的文件夹,大家姑且可以这样理解!然后这个文件夹包含了能够运行我们代码的最小组件,函数库。这样就可以称之为一个包了。
博主这里的小工具比较的简单,如下:
 E:\Code\Python\DataStructor\translate\mytranslator 的目录

2016/10/08  15:52    <DIR>          .
2016/10/08  15:52    <DIR>          ..
2016/09/29  09:12                50 mytranslate.bat
2016/10/08  15:50             1,221 translate.py
2016/10/08  15:51               151 __init__.py
               3 个文件          1,422 字节
               2 个目录 87,527,870,464 可用字节
其他文件
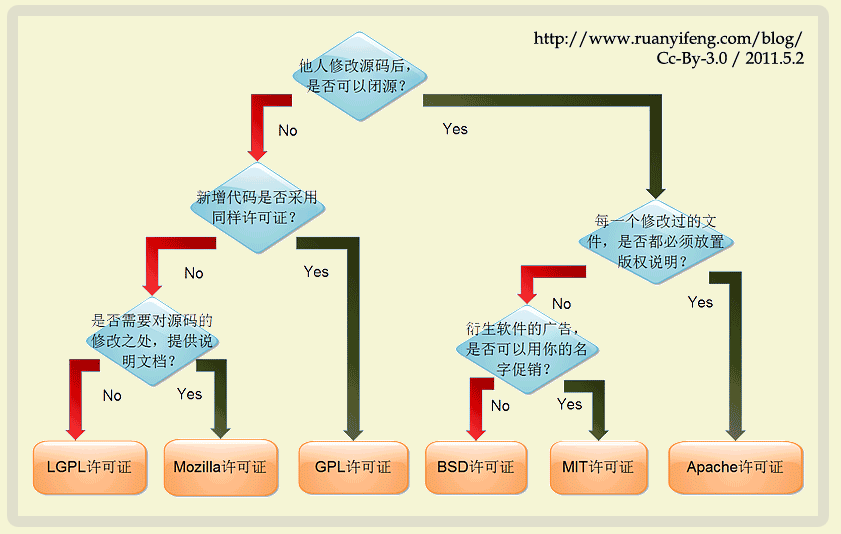
其他文件是为了让你的用户对这个项目有更加深刻的了解而存在的,跟打包程序关联不大,但是这并不是说不重要。尤其是README.md文件和LICENCE文件,这都是非常的有价值的。LICENCE的概念大家可能比较的陌生,有兴趣的可以参考博主之前转载的一篇文章。http://blog.csdn.net/marksinoberg/article/details/52337214
各种开源协议可以归纳如下:
(图片转载至阮一峰博客)
制作过程
下面谈谈博主制作这个小工具的过程吧。
首先上场的肯定是setup.py了。如下:
# coding:utf-8
from setuptools import setup, find_packages

setup(
    name='mytranslator',
    description='Simple translator in English and Chinese, easier to use',
    url='https://github.com/guoruibiao/MyTranslator',
    version='1.0.1',
    license='MIT',
    packages=find_packages(),
    entry_points = {
        "console_points": ['trans = mytranslator.translate:main']
    },
)
然后是LICENCE
MIT License

Copyright (c) 2016

Permission is hereby granted, free of charge, to any person obtaining a copy
of this software and associated documentation files (the "Software"), to deal
in the Software without restriction, including without limitation the rights
to use, copy, modify, merge, publish, distribute, sublicense, and/or sell
copies of the Software, and to permit persons to whom the Software is
furnished to do so, subject to the following conditions:

The above copyright notice and this permission notice shall be included in all
copies or substantial portions of the Software.

THE SOFTWARE IS PROVIDED "AS IS", WITHOUT WARRANTY OF ANY KIND, EXPRESS OR
IMPLIED, INCLUDING BUT NOT LIMITED TO THE WARRANTIES OF MERCHANTABILITY,
FITNESS FOR A PARTICULAR PURPOSE AND NONINFRINGEMENT. IN NO EVENT SHALL THE
AUTHORS OR COPYRIGHT HOLDERS BE LIABLE FOR ANY CLAIM, DAMAGES OR OTHER
LIABILITY, WHETHER IN AN ACTION OF CONTRACT, TORT OR OTHERWISE, ARISING FROM,
OUT OF OR IN CONNECTION WITH THE SOFTWARE OR THE USE OR OTHER DEALINGS IN THE
SOFTWARE.
这样基本上就可以了。
注册
注册之前,最好是在官网上注册一个账号,因为这对今后的上传自己的库会很有帮助。
官网如下: https://pypi.python.org/pypi/
需要注意的就是用户名为ASCII支持的,密码为字母加数字即可。完成之后就可以进行接下来的工作了。
在项目的根目录下输入:
python setup.py register sdist upload
然后会有一个选项,默认选择为数字1,咱们可以按自己的情况来输入。博主由于注册了一个账号于是选择1.
最后出现如下字样,就说明您的库已经上传到了pypi上面了。
running upload
Submitting dist\mytranslator-1.0.1.zip to https://pypi.python.org/pypi
Server response (200): OK
这个时候你会发现自己项目的文件夹下面多了一点东西。基本上如下图所示。
测试
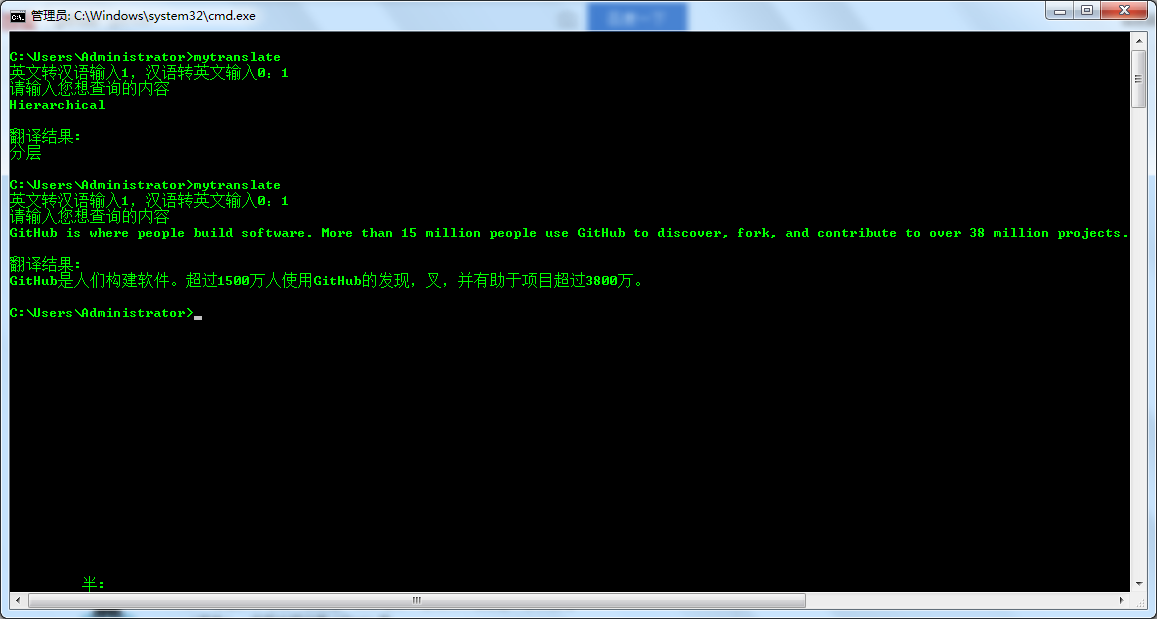
接下来,Python2.7的小伙伴们就可以自己下载博主的这个库了。其实它到底有什么用呢?
其实就是个可以在命令行下面实现英语汉语单词,句子的翻译。而且对于Window尤其优化了编码的支持。详细的可以参考博主之前的文章http://blog.csdn.net/marksinoberg/article/details/52701650
英文转汉语
汉语转英文
好了,废话不多说。下面介绍一下怎么安装这个库吧。
安装的时候,出现下面的字样,那么恭喜您,成功地安装了博主的库了。
(temp) E:\Code\Python\temp\Scripts>pip install mytranslator
Collecting mytranslator
  Downloading mytranslator-1.0.1.zip
Building wheels for collected packages: mytranslator
  Running setup.py bdist_wheel for mytranslator ... done
  Stored in directory: C:\Users\Administrator\AppData\Local\pip\Cache\wheels\ec\29\22\f37da8b8f8fef3
a08472f50c0a084995236ba10cf8af52bb20
Successfully built mytranslator
Installing collected packages: mytranslator
Successfully installed mytranslator-1.0.1
总结
照例,最后一点都是回顾一下这按文章的主要内容。
制作自己的Python分发版库的必要的知识。以及详细的一个流程介绍。
知识点不难,重在尝试,不妨现在就动手,做出你的分发版吧。
